Study Definition module
Setting up randomisation
You will use a combination of Arezzo and the subject registration feature to set up randomisation in your study. We use registration to generate a sequence number for each subject. This number is used to determine which treatment from a random sequence is assigned to the subject.
There are several steps:
-
Create the randomisation action/s
-
Specify the trigger point
-
Specify the format of the registration identifier
-
Specify the registration conditions
-
Create an interim question to collect the sequence number
-
Evaluate the randomisation result
-
Choose how to collect the randomisation result
Create the randomisation action/s in Arezzo
This is where you specify the random sequence/s that will be used to assign treatments. Using Arezzo to do this means that the random sequence is hidden from the data entry user. It could be entered directly into a question derivation but it would then be accessible from the eForm as part of the question information.
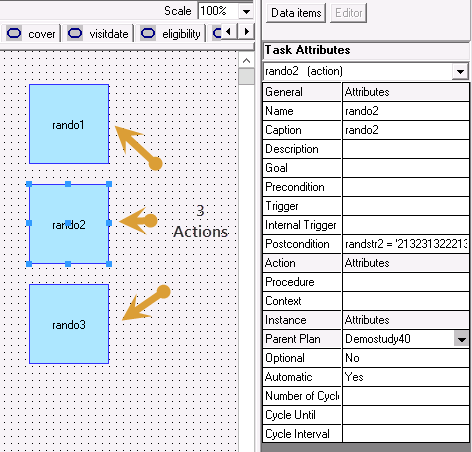
If a sequence exceeds the maximum Arezzo string length of 1000, you must split it into multiple sequences, and you must create an action for each one.
Create an action for each random sequence string, as follows:
-
In the Study Definition module, open the study for which you want to set up randomisation.
-
Click the Arezzo button to open Composer.
-
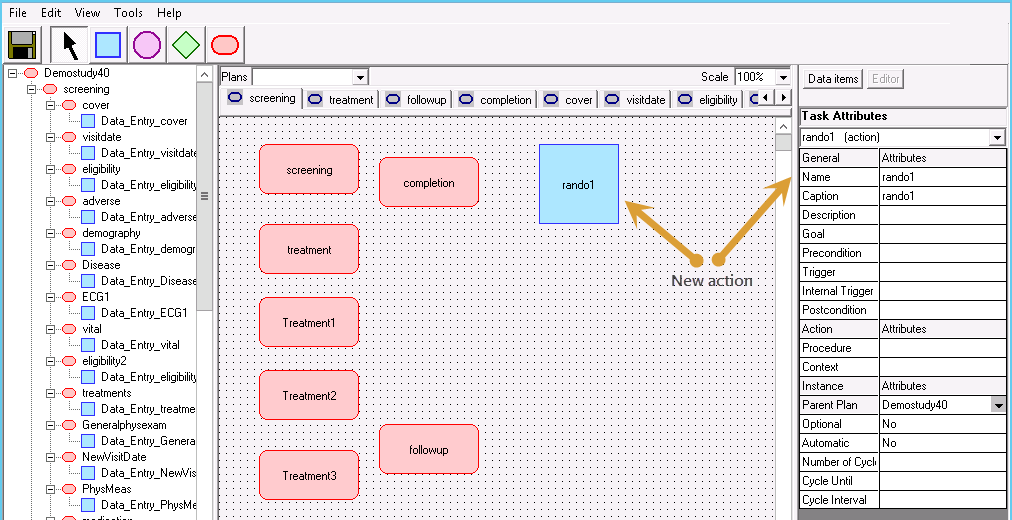
Add an Action (blue square) to the workspace within the top-level study Plan (pink rectangle) and rename it in the panel on the right. See example
-
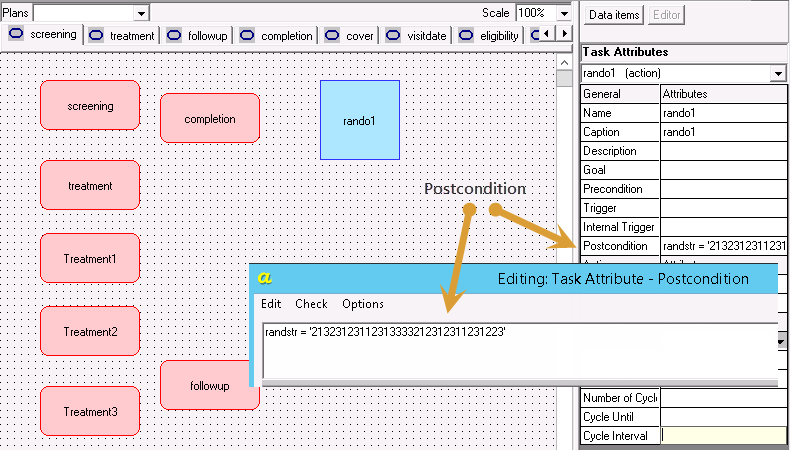
Create a postcondition to assign the randomisation string to a data item. Note the name of this data item as you will refer to it later. See example
-
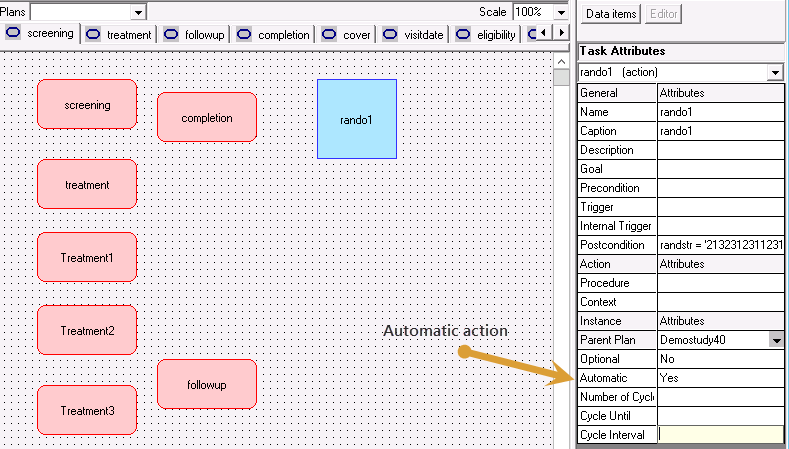
Set the Action to be automatic. This means the Action will activate without user intervention. See example
-
Repeat for each random sequence. See example
-
Save and close Composer.
Specify the trigger point
This is where you choose the point in the study at which you want registration to occur. We are using the registration feature to activate our randomisation process. Randomisation will occur after registration.
-
From the Study Definition module, click the Study button to open the Study Definition window.
-
Click the Registration tab.
-
In the 'Subject Registration occurs after' field, select a visit and an eForm. A subject will only be randomised when this eForm has been successfully completed (including any mandatory questions). See example
Specify the format of the registration identifier
The registration process creates a unique code for each registered subject. When using registration for randomisation, this identifier will be assigned to each randomised subject in sequential order. This is where you design the construction of this code.
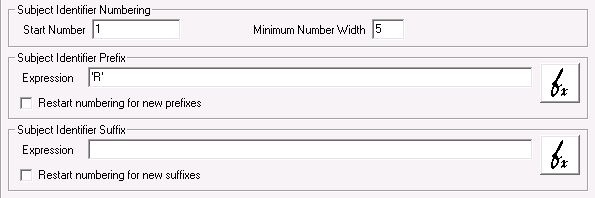
Still in the Registration tab, use whichever of the 'Subject Identifier' fields you need to build the randomisation code.
-
The identifier will be incremented by one each time a new subject is randomised. Enter the Start Number at which you want the identifiers to start.
-
Enter the Minimum Number Width for the identifier. The width determines the number of leading zeroes that will be added before the identifier. For example, if you have specified a number width of 5, the identifier 4 would be displayed as 00004 and the identifier 345 would be displayed as 00345.
-
If you wish to add a prefix or a suffix to the subject identifier, enter a string or an expression into the Subject Identifier Prefix/Suffix Expression fields. The value returned by the expression will be used as the prefix/suffix.
Do not check the 'Restart numbering for new pre/suffixes' box as this will reset identifier numbering, which will result in duplicate randomisations.
See example
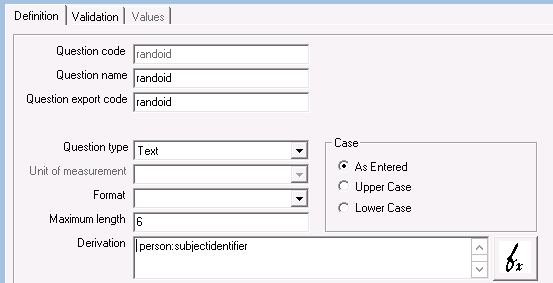
The registration identifier generated by the registration process is referenced in Arezzo as 'person:subjectidentifier'. You can use this however you wish in your study. For example:
-
To create a derived question to display the subject identifier, create a text question and enter 'person:subjectidentifier' in the Derivation field. This question can be placed on an eForm and will display the identifier once randomisation has occurred. Ensure that the text question maximum length is big enough to display the prefix, suffix and code that you have specified. See example
-
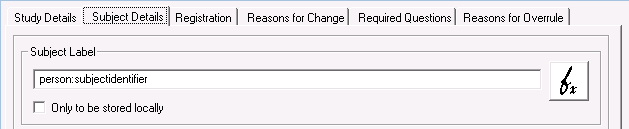
To use the subject identifier as the subject label, click the Study button to open the Study Definition window and select the Subject Details tab. Enter 'person:subjectidentifier' in the Subject Label field. See example
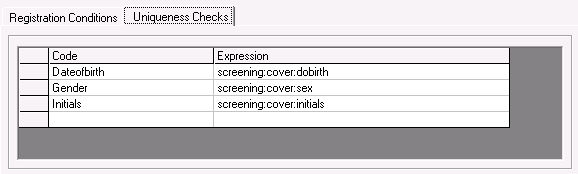
Specify the registration conditions
This is where you create the conditions and uniqueness checks that determine whether a subject can be registered. You can include any checks you need for randomisation here.
You can use Arezzo to make these checks as simple or complex as you need. A simple condition might check that a particular question has been answered. A simple set of uniqueness checks might look at date of birth, gender and initials and only allow randomisation if these are all unique to the subject (checking against all previously randomised subjects). A subject must meet all the registration conditions AND all the uniqueness checks in order to be registered, and therefore randomised.
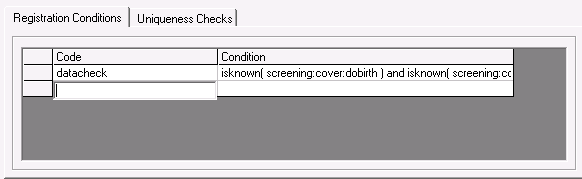
Still in the Registration tab, locate the tabs at the bottom of the screen and enter a code and an expression for each condition. If using expressions that relate to questions in the study, ensure that these questions are located (and will be completed) before the trigger point specified earlier.
See examples
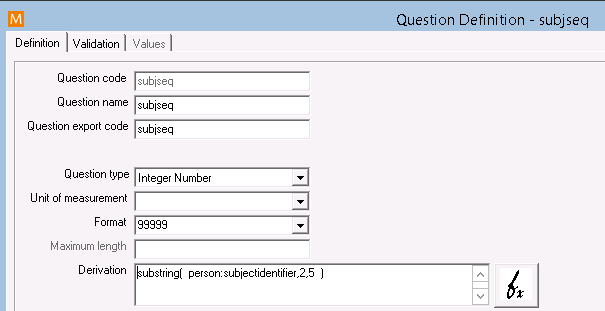
Create an interim question to collect the subject's registration sequence number
We recommend that you create an extra question to collect the subject sequence number. This splits the randomisation process into stages which makes it easier to identify any problems if they occur. You can skip this step but you will need to alter the Arezzo expression in the derived question that collects the randomisation result (next step) as the examples we give there reference this interim question.
To create the interim question:
-
Create an integer number question.
-
In the Derivation field, enter an expression to derive the sequence number from the registration identifier. This sequence number will determine which character is selected from the randomisation string. See example
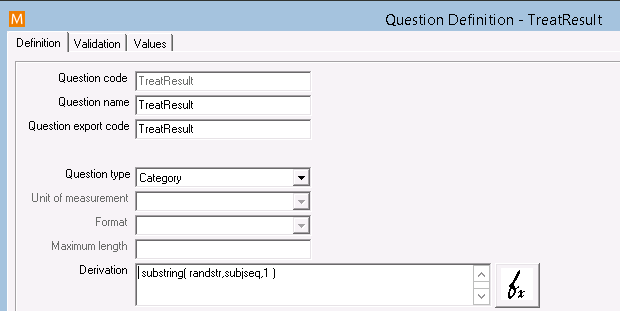
Evaluate the randomisation result
Having derived the sequence number we now use the following Arezzo expression to select the relevant character from the randomisation string:
substring( randstr,subjseq,1 )
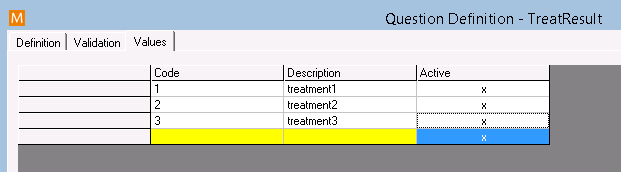
Choose how to use the randomisation result
The randomisation result will give the treatment group that has been randomly allocated to a subject. You may wish to display this information on an eForm or you may simply use it in an OCI (Only Collect if) condition or internal trigger to determine which further questions are presented for the subject.
To display it on an eForm:
-
Create a category question. On the Values tab, create a value for each treatment option. This may be the treatment name or a code if you are running a blinded study. See example
-
Back on the Definition tab, enter the expression in the Derivation field to collect the random treatment. See example
-
If you have to split your sequence into multiples (due to strings longer than 1000 characters), you need to automatically assign treatments from the next sequence, once all treatments have been assigned from the current sequence. See example
Related Topics
About randomisation