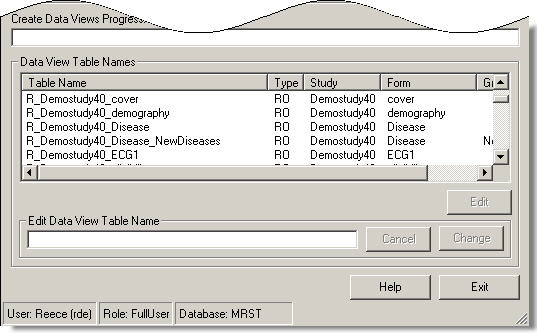
The second step in creating data views is to create the names of the tables. MACRO creates default table names but you can change these if you wish.
Before you can do this, you must have specified the structure of the tables.
Click the Create Data View Names button.
MACRO will generate default names for all the tables. They are displayed in the Data View Table Names display area. Click for an example. Any existing tables will be replaced.
The Date Last Run display next to the Create View Names button will also be filled in with the current date.
Note: Table names cannot contain more than 28 characters. MACRO generates the table names in the format prefix_study name_eForm code (followed by _groupcode if applicable), and names are truncated after the 28th character. To ensure that the table names are easy to read, we recommend that you make your form codes as short as possible.
It is possible to change individual table names once they have been created and are displayed in the Data View Table Names display area. To do this:
Select a name from the list and click Edit.
Make your changes and click Change to accept the change, or click Cancel to abort.
Remember that table names must not be longer than 28 characters, and you won't be able to specify the name of a table which already exists in the MACRO database.
Once you have created the table names, you will need to repeat the procedure if any of the following changes are made to the study definition:
Deleting questions
Adding new questions that you wish to use for reporting/exporting
Changing the schedule
Changing a question type
Moving questions between eForms
The following changes will not require you to recreate the table names:
Changing the values within a category question
Reordering questions on an eForm
Once you have named the tables, you are ready to create the tables and to populate them with the response data that has already been collected in the MACRO database.