The schedule is a visual display indicating which eForms should be completed at each subject visit. You must arrange the visits and eForms in a way that will best reflect the information that is to be collected. Schedule layouts may vary greatly between studies.
Before you can create the schedule, you need to have created at least one eForm and at least one visit.
Open the schedule by clicking the Visits shortcut button.
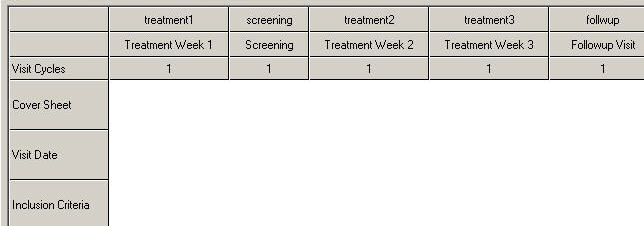
The schedule is displayed as a grid. See image
Visits are displayed in columns, with the visit code and title at the top. eForms are displayed in rows, with the eForm title in the left margin.
A 3-way toggle means you can click a space to add a single eForm, click a single eForm to convert it into a repeating eForm and click a repeating eForm to remove it from the schedule. Or you can use the right click menu to perform any of these actions.
![]() To add an eForm to a visit, you need the 'Add eForm to visit' permission
To add an eForm to a visit, you need the 'Add eForm to visit' permission
To add an eForm to a visit, click on the schedule at the intersection of the eForm row and the column of the visit in which the eForm should be completed. Click Yes to confirm. A single eForm icon will appear. See image
To add a repeating eForm, either click on a single eForm icon and click Yes to confirm the change or right click at the intersection or on a single eForm and select Allow Multiple eForms from the popup menu. A repeating eForm icon will appear. See image
![]() To remove an eForm from a visit, you need the 'Remove eForm from visit' permission
To remove an eForm from a visit, you need the 'Remove eForm from visit' permission
To remove an eForm from a visit, right click on the eForm icon and select Remove eForm from Visit from the popup menu.
eForms cannot be removed from the schedule after a study has been opened for subject data collection. To avoid accidental changes, you will be asked to confirm your action if you try to add an eForm or change an existing eForm into a repeating eForm once a study has been opened.
To re-order the eForms in the left margin, click on an eForm name and drag it up or down to a new location. This order is reflected in the questions list if not ordered alphabetically, and also in the order of the eForm tabs.
To re-order the visits, click on a visit code and drag it left or right to a new location.
To make a repeating visit, click in the Visit cycles row and enter the number of cycles you require. See image This means that the data entry user will be able to fill in more than one copy of the entire visit.
To make the visit cycle indefinitely, enter either -1 or the word Unlimited.
You can use the Arezzo Composer to impose constraints on your schedule so that users must complete one eForm before they can open another. More info on this...
The details of a visit schedule are listed in the Annotated CRF and Study List reports.