Select View > Search Panel or click the Open Search Panel icon
 to open the search panel. General help on using the search panel
When you open the search panel, it will appear as it was when the panel was last closed.
At any time you can clear all the search fields by clicking the Clear Search fields icon
 at the
top of the panel.
at the
top of the panel.To save a search for future use, click the Save Search icon
 at the top of the panel to save the current combination
of search settings. Enter a name for the new search
or click Replace Search and select a search to overwrite.
Click Save. Searches are stored separately for each user.
To open a previously
stored search, click the arrow to the right of the Open
Stored Search icon
  at the
top of the panel and select a search from the drop down
list.
Select the type of report you wish to run from the drop down list at the top. See image
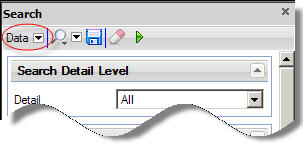
Select your search criteria. Help on each field within the search panel
Search Detail Level
Detail
Select the level of detail to which you want to see data.
General
Study
If you are permitted access to data from more than one study, you can choose to view data from all studies, or from a particular study only. Select your choice from the drop down list.
Site
If you are permitted access to data from more than one site, you can choose to view data from all sites, or from a particular site only. Select your choice from the drop down list.
Subject
You can choose to view data entered for a particular subject only, by entering the subject label (part or whole), or the subject ID. The subject list will open, containing only those subjects who fit your search criteria.
Statuses
Select/Clear All
Use this toggle to either check all the status boxes or to clear all checks. Hover over a status icon to see the status label as a tooltip.
status
Click these check boxes to include all questions with a particular status or combination of statuses. You can select multiple check boxes.
Comments
You can choose to:
disregard comments (by leaving the list blank)
only include questions with no comments attached (None)
only include questions with comments attached (All).
Select your choice from the drop down list.
Notes
You can choose to:
disregard notes (by leaving the list blank)
only include questions with no notes attached (None)
only include questions with notes attached (All).
Select your choice from the drop down list.
Frozen/Locked
Frozen/Locked
You can choose to:
only include questions that are neither frozen nor locked (Not Frozen and Not Locked)
only include frozen questions (Frozen)
only include locked questions (Locked)
only include questions that are either frozen or locked (Frozen or Locked)
only include questions that are not frozen (Not Frozen)
only include questions that are not locked (Not Locked)
disregard freeze/lock status (by leaving the list blank)
Select your choice from the drop down list.
DCRs/SDV Status
DCR
Select a status from the list to include questions with DCRs of that status. The statuses are raised, responded, closed, printed or received. This section is only available if your user permissions allow you access to DCR data.
SDV
Select a status from the list to include questions with SDV marks of that status. The statuses are planned, queried, done or cancelled. This section is only available if your user permissions allow you access to SDV data.
Study Level
Visit
You can include data from all visits, or from a particular visit only. Select your choice from the drop down list.
eForm
You can include data from all eForms, or from a particular eForm only. Select your choice from the drop down list. This list will only contain eForms available in the selected visit.
Question
You can include data from a particular question only. Select your choice from the drop down list. This list will only contain questions available in the selected visit/eForm combination.
User
User
You can include data entered by all users, or by a particular user only. To specify a particular user, select the name from the drop down list.
Date Range
Search
You can search for data before or after a certain date, during a certain period or with no date restrictions. Select your choice from the drop down list.
From
Enter the date from which you want to search by clicking the arrow and selecting the date form the popup calendar.
To
Enter the date to which you want to search by clicking the arrow and selecting the date form the popup calendar.
Clinical Coding
Type
You can choose to view thesaurus questions associated with all MedDRA dictionaries, or from a particular dictionary only. Select your choice from the drop down list.
Statuses
You can choose to view thesaurus questions with a specific coding status. Select your choice from the drop down list.
Click the Execute search button
 to display
the data in the Data Browser in the main window. What to do if you are told your search exceeds
the maximum number of records
to display
the data in the Data Browser in the main window. What to do if you are told your search exceeds
the maximum number of recordsYou will be alerted if your search results exceed the maximum number of records allowed in a browser report. If this happens the DCR browser will not open until you change your search criteria to reduce the number of DCRs in the results.
Once the report is open in the browser, the number of records displayed is shown at the bottom of the browser.
To change the maximum records limit, go to Tools > Options.../Administrator Options...
